Pecha Kucha: A speaking activity gone wrong that turned out extremely right.

Today I used a pecha kucha style speaking activity with Adios Textbook’s street food unit. The traditional pecha kucha is made up of 20 slides that the speaker talks about for 20 seconds. For my Spanish pecha kucha, I cut the pictures down to 6 slides and asked students to talk for just 10 seconds. The activity went amazingly well but not before it went wrong.

The Mistake and the Fix

Students took turns speaking in pairs about pictures of typical street food from Hispanic countries. I projected the pictures on the wall and advanced the slides every 10 seconds. It was immediately obvious this wasn’t enough time to process the picture, recall information, and speak in the target language. I stretched the time to 15 and then the full 20 seconds and it went much better.

The Problem

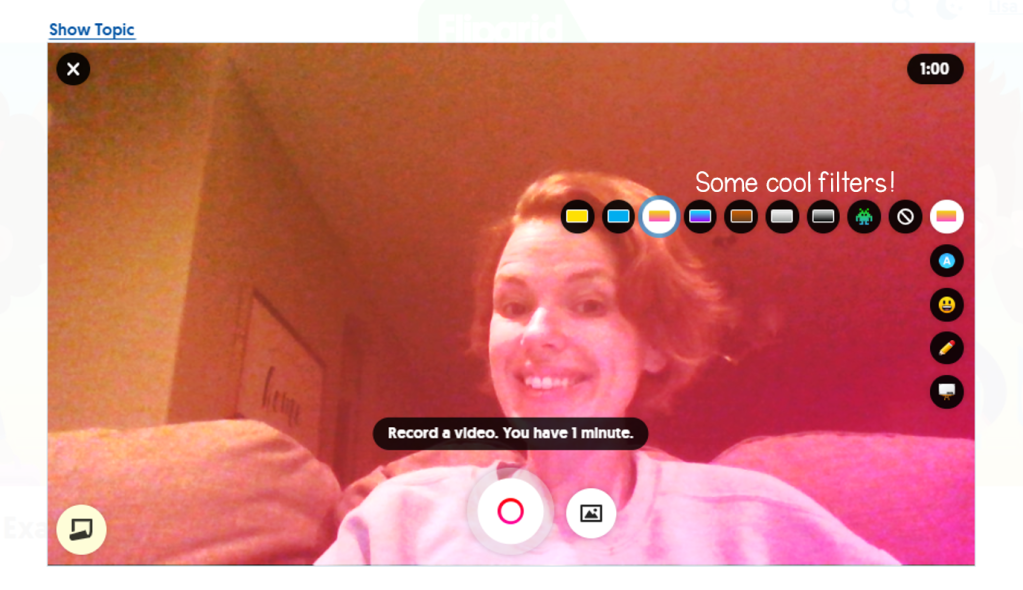
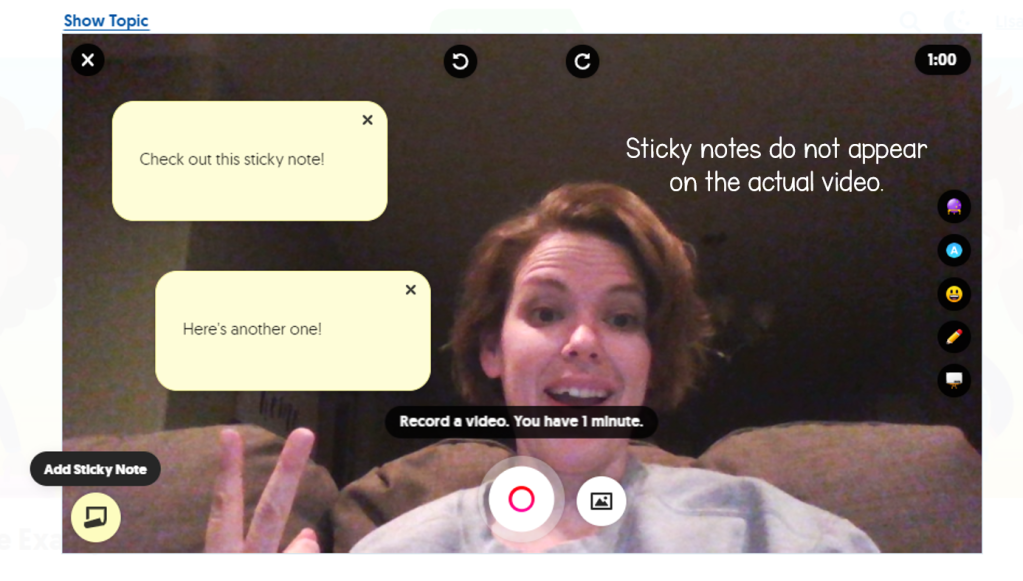
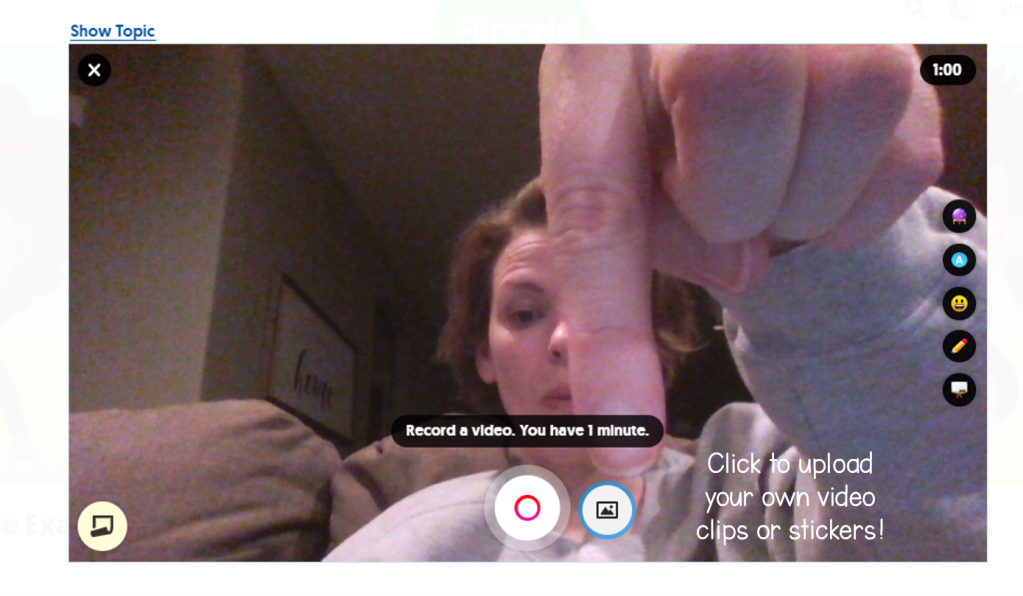
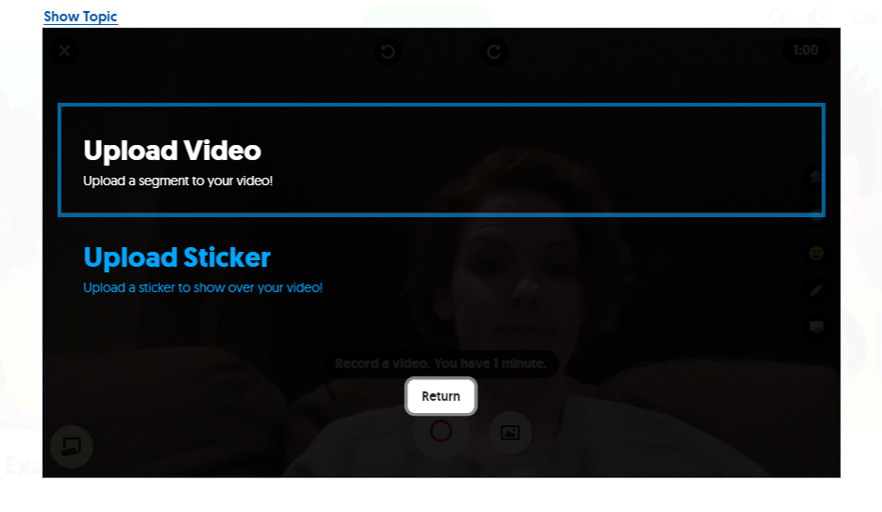
After speaking in partners, I planned to do a formative assessment using Flipgrid (for more info, see my posts about Flipgrid in the world language class). I had created a video of three images that appeared for 10 seconds before advancing. This meant that students would only have 10 seconds instead of the necessary 20+ seconds they really needed. I had them do the speaking and an amazing thing happened. They didn’t have time to think.

The (Unexpected) Awesomeness

Because the students had no think time, they simply spoke Spanish without thinking about it and sounded real, and authentic.

This was a group of Spanish 4 students who always want to be “right” and “correct”. It’s tough to get them to speak off the cuff without pre-writing or thinking everything out first. Not only did they simply speak and not think, they had fun with it!

It was a bit ridiculous how fast everything moved and they were smiling and laughing during their videos. Despite the short time-frame most students were able to get a lot of info packed in such as
-what the food is
-main ingredients
-where it’s popular
-their opinions (quiero probar, me parece rica…)

I plan on doing a similar activity for their summative assessment. I feel like today was a big confidence boost to students.

Flipgrid in the World Language Class: Student Video Features!

This is the second in a series of posts about using Flipgrid in the world language classroom. You can catch the first post here about captions, transcripts, and the immersive reader features. Let’s look at the features available to students as they record a video! Please note that you can turn these all on or all off (no in between) for student videos &/or selfies.

On the right side of the recording screen, students have several tools (if you enable them) here they are:

Filters

Let’s face it. Filters can help A LOT on a day when we just aren’t feeling or looking our best! They are also helpful for lowering the affective filter and helping students feel more comfortable speaking on video.

Type Text on a Video

Students can now type text on videos. In the last post I talked about Flipgrid’s auto-generated captions. Students can create their own subtitles or highlight key words/phrases! What a great way to throw in some rejoinders you’ve been using in class or respond to their own speech with text reactions! There are a few color options and text can be resized and moved as needed. You can also move it off the screen and out of view if you’re done with it. I think this feature could compliment the drawing feature for story telling too. More on that in a minute.

Stickers

Who doesn’t love a sticker? My high schoolers do and now they can stick them on their videos. There is a huge variety. Basically all the emojis are available as well as dress up accessories and some school-related items. Oh, and yetis and unicorns of course!

Drawing on Video

Students can now draw right on their video. How great would this be for a story retell or to aid in practicing circumlocution?! Students could circumlocute a word in the TL then draw it at the end. I think this could be a fun class-made game!

Whiteboards & Blackboards

Students can pop up a white or black board to draw on. I’m thinking story retells or explaining grammar concepts. The tricky thing is that I have yet to find an erase button other than the “undo” button and once you leave the whiteboard, the writing stays on the video. It can be moved out of frame but an eraser would be great. Am I just missing it? Comment below and help me out if I am!

Sticky Notes

Sticky notes DO NOT appear on the video. They are apparently just to help the speaker out. Could be useful for students to organize their thoughts or reference key phrases without taking their eyes off the screen…could also be a path for academic dishonesty. Not sure I’ll use these just yet…

Show/Hide Topic

This is one of my favorite features. It isn’t new but it is a game changer! When you click “Show Topic” the topic instructions will appear! They do not show up in the video, only the student can see them. I use this when I have students record videos navigating a map. They can click “Show Topic” and see the map but their faces still appear in the video. So helpful for the, “What are we supposed to do?” instances.

Upload Your Own Files

Want to pre-record a video or make stickers more personal? Students can upload files! I have yet to use these features but I’ll probably be uploading some Bitmojis in the near future to use! Students could also upload actual photos as stickers and talk about them! This opens up so many possibilities!

There you go! A quick run-down of the features available to students as they record videos. Turn these features on or off for student videos/selfies when you create or edit a topic (NOT a grid, the topic).

In the next post I’ll be sharing practical ideas to use Flipgrid in Spanish (or any world language) class.

Previous posts in this series
Flipgrid Post #1: Captions, Transcripts, Immersive Reader

Impromptu Spanish Speaking Practice

I don’t know about you but some of my students dread speaking in Spanish. Hello?! It’s a language. Most often, you speak it! One way I’m pushing my kids to practice speaking Spanish without freaking out is what I’m calling “Impromptus”.

Microphone with text easy, no-prep, spanish speaking practice

This idea was born out of a spur of the moment idea and I’m happy with how it’s progressing. Some key points:

  • This is my third year teaching these students so we have an established relationship of trust.
  • It is a 5 point formative grade so it is very low risk.
  • I stress that the goal is not perfection, it’s communication.

The Process

One day each week, 2-3 students (depending on the size of the class) will do an impromptu to practice speaking Spanish informally. Each week the theme is different but it always centers around known, familiar vocab. The goal is for each student to do an impromptu each month.

I model first with whatever prompt they’ll use. I draw pictures to help understanding and use circumlocution to model the skill.

drawing of stick figures, castle, racoon, disney figure, curly hair, for Spanish speaking practice activity
My amazing drawing skills. That’s a raccoon, not a ninja cat.

Next, I’ll clarify the speaking prompt, and the first student (volunteer or random draw) will come up, speak & draw. I may ask questions to encourage more language use or because I’m genuinely curious. I allow the class to comment or ask questions in the TL as well.

This is not meant to be a long, nor a formal speech. There is no set time limit but they range anywhere from 3-7 minutes depending on how much students have to say and how many pauses they have.

Prompt Ideas

I’m setting the prompts to guide them to use certain skills (ir a + infinitive, subjunctive, comparisons, etc).

  • Describe your best friend.
  • What did you do this weekend?
  • What’s your favorite meal?
  • What are you going to do this weekend?
  • Describe your favorite place. Why do you like it?
  • What was your favorite TV show or book as a kid? Describe the characters and premise.
  • What do you want to be when you grow up?
  • If you could change something about our school, what would it be and why?
  • What was the best gift you ever received?
  • What Christmas traditions do you have (I teach at a private Christian school)?
  • What’s the best restaurant/school meal/sports team/app/etc & why?

Grading

This is a 5 point formative grade. Currently I grade on the following criteria:
-Is it comprehensible: 2 points
Effort (Stays in TL, uses circumlocution): 2 points
-Speaks in sentences: 1 point

rubric to grade spanish speaking practice

Students have blown me away with how creative and (intentionally) funny they are in this impromptu Spanish speaking practice. Next semester the point value may increase but for now, it will remain a relatively low-risk speaking practice activity as students gain confidence and model language for each other.

How do you encourage students to practice speaking Spanish? Leave a comment or link to a post below. I’d love to hear and learn from you!

Assessing “La Familia”: A 3 Mode Approach

I just wrapped up my “familia” unit where we discuss adjective matching and learn to describe people’s appearance and personality. As I move towards assessing proficiency (I have a LONG way to go yet!) I wanted to try something a little different for summative assessments. Here’s what I did (and materials!).

Assessment 1: Presentational Writing & Speaking

I still wanted to assess students’ grammar so I had them write short descriptions of their family (or “family” a made up family or friends as family). They worked on their descriptions in class starting with this outline to get their ideas together.

I read their first draft and highlighted errors such as verb conjugation or choice (tener vs ser), adjective matching, spelling, missing accents, and any missing information. I didn’t correct errors, simply circled or underlined to draw their attention to it and let them figure out what was wrong. I did help and tell them it was adjective matching or verb conjugation if they didn’t figure out what was wrong on their own. Again, I didn’t correct it for them, but pointed out the error and maybe talked them through the first adjective matching issue so they could figure out how to fix the rest on their own. 

Students made changes based on my feedback then had a partner proof read it.  They turned in their final draft of the writing and I graded it using the rubric in this file. Students also did a short presentation of their family to the class on one of two speaking days. 

Assessment 2: Interpersonal Speaking

I wanted to see what students could really do with the language in a speaking situation. One on one I had students describe people they’d never seen to me. I gave students a card with a picture of a person or group of people, the name(s), relationship, and some description in English. You can see the rubric by checking this file. I’m not 100% happy with this rubric and will tweak it before next year or my next assessment like this.

To prepare I had students record descriptions using Flipgrid. In the grid I posted a picture with description in English just like they’d see in our conversation. I then posted a video of me speaking, asking questions such as, “Who is this?”, “What is she/he like?”, “Are they part of your family?”, “What’s their personality like?”. This helped students get over their fear of speaking and they heard me asking the questions. I moderated the posts so other students didn’t see their videos, only I did. I gave students feedback after each video which went pretty quickly. I was able to give video responses to help them with pronunciation which was great. Some tips I figured out along the way:

  1. The first time I let students listen to my questions, write them down, and prep their responses.
  2. The second time I let students write down my questions and think about responses but not write.
  3. The third and final practice I had students just listen to the questions then respond immediately without thinking or preparing (how often do we get to tell students not to prepare or think ahead?!)

I had to push students to work in that way because I didn’t want them stopping and thinking and trying to be perfect in our conversations. I praised the students who didn’t prepare and weren’t really rehearsed during the practice rounds and encouraged those who were simply reading their prepared responses to push themselves to do their best and trust their skills.

Assessment 3: Interpretive Reading

I reached out to Twitter for some help with this and the amazing Lisa Shepard (@mmeshep) shared her post about a family IPA with me. I loved the reading format and created a Spanish version. I made two practice versions (including a version modified for students who struggle with reading comprehension), a test version, and a retake version. I’ll be posting those soon once I get everything compiled and “pretty”. Keep an eye out for a tweet from me (@lisajmch) sharing those.

The basic format is a paragraph that includes family and descriptions. Students are then given a list of 15 “details” in English from the reading. The catch is that not all of them actually appear in the reading. Students check the items that do appear and then write the info in English to show they understood it. Again, here’s the link to the rubric/grading information for this portion.

Final Thoughts

  • I loved using Flipgrid for formative practice and preparation. I’ll continue to use it more now that it’s free!
  • I really liked this twist on interpretive reading. It was a bit of a challenge for me to write at first but with practice I know I’ll get better.
  • I need to spend more time preparing students for the presentational speaking so they don’t read their notes too much. In the future I think I’ll build in some practice presentations in small groups.
  • The one on one conversations/interpersonal speaking was my favorite part of this. I look forward to incorporating more of this type of assessment moving forward.

Convo Circles: A Student Favorite

*This is a classic post from my previous blog, Musings de la Maestra McH. Enjoy!*

I posted awhile back about doing conversation circles ala Amy Lenord (@alenord).  This week, at the request of the students, we had our 3rd or 4th conversation circle day.  Since starting this, students love them and stay in TL 99% of the time!  When students saw “Convo Circle” on the agenda, they were excited!

This time we talked about graduation, summer, looking  back on this year and what they hope for next year.  I had about 10 students this time which was a nice size.  I gave them about 10 minutes to come up with questions they wanted to ask then we circled up and started talking.  My students love to “fight” with each other and disagree or refute points.   It’s pretty funny and all in good fun.  (Last time we had a 5 minute argument about onions which involved every student in class!)  The next day, one of my track kids who was gone for the circle was mad she missed it!

The more we do, the better students get at extending phrases or getting brave and jumping into the conversation more.  I’ve also seen improvement in their phrasing as their speech becomes more fluid and less halting as they think of what to say.  This has been a really great activity and I’m thankful to Amy for sharing it!

Until Next Time,

Maestra McH

Practicing the Alphabet & A Cultural Update

Teaching the Spanish alphabet to high school students, how to do it without it being too juvenile. That was my challenge when searching for Spanish alphabet practice activities. I needed something appropriate for my students’ ages (14-16) yet simple enough for their novice-low proficiency levels. My goal is that students are able to confidently spell their last names and understand words they hear spelled aloud. I created this Spanish alphabet listening practice for them.

I love it for a few reasons:

  1. It gets kids up and moving.
  2. It gets them asking questions in Spanish (¿Qué es letra dos?)
  3. It introduces them to the word qué
  4. It gives them a chance to say the letters aloud and listen to them

Initially I wrote five letter Spanish words my students don’t know on index cards. I chose words that my students won’t know so that they can’t guess the word before hearing all the letters.  The cards are written in the following format:

I’ve since updated to printed, clearer versions of 5-letter and 6-letter words that include question scaffolding right on the card. When I first began I taped a card to each student’s back. This is awkward and time consuming. Pair up students and have them tape cards to each others backs so they can’t see it. You can also tape them to the back of a whiteboard.

The classic version of this activity:

  • Students walk around and ask their classmates, “¿Qué es letra uno?”, “¿Qué es letra dos?”, etc.  
  • They can only ask each person one letter.  
  • Students write the letters on white boards as they go.  
  • Once students have all the letters, they have to check with me to see if they are correct.  
  • If they are they will sit down and wait to swap cards for round two. It’s important to emphasize that they can still answer people’s questions.

For more structure:

  • Do the same procedure as above but instead of freely walking around, use the two-line or inside/outside circle approach
  • Students move and change partners for each letter when you signal them to move
  • This is also makes it easy for students to swap cards with their final partner for the next round of practice

For whole class, paced practice:

  • Pair up students, have them stand around the room with one person facing your projector and one looking way
  • Project a sheet of words
  • The students facing the projector spells the words to their partner who write them on a white board or paper.
  • When done with all 4 words, partner switch places
  • Pro-tip: Encourage groups to start in different places (top left, bottom right, etc) to avoid the echo effect of everyone spelling the same word.
  • Make sure groups are spread out so they can only hear their partner.
  • If you want, at the end of each round, spell the words aloud yourself to reinforce proper pronunciation of the alphabet.

Formative Alphabet Pronunciation Assessment

I teach in a 1:1 school so it would be easy for me to assign 4 words (1 page of cards) to a student and ask them to record themselves spelling the words via Flipgrid or turning in a video/audio file via our learning management system. This allows me to:

  • hear individual student pronunciation
  • provide recorded audio feedback to aid in pronunciation
  • give personalized encouragement to my students

Station Use

Similar to the whole class paced practice, these make a great station.

  • Students draw a card and spell the word to their partner
  • Switch roles
  • Alternatively, students draw a card and record a video of themselves spelling the word. Partners can film. You review the videos at a later time for formative assessment

Upper Level Use

An upper level twist I hope to implement is this: use words to introduce culture.  Instead of writing common, random words, I’ll write culturally significant words such as “alebrijes”, “Botero”, “la guagua”, “mariachi”, etc.  After figuring out what the word is, students will research the topic they have (I work in a 1:1 school where students bring their own devices. If you don’t, plan this activity on a lab day OR print starter articles for students to look at and head to the lab next class!).  I’ll provide them a guide sheet with question to answer such as,

  • What country or region is your topic affiliated with?
  • What is your topic (arte, música, deportes, etc)
  • Describe your topic using words you know (colors, adjectives, associated nouns like “paint”, “instruments”, etc)
  • List two interesting/fun/surprising facts about your topic
  • Find three more words in Spanish related to your topic

Students could make a quick presentation they share with groups then build upon, practice, and refine to share with the class. Shortened pecha kucha anyone? 🙂  Things I like about this twist to the original:

  1. Review the alphabet and spelling!
  2. Differentiate by giving students longer words or shorter words. 
  3. If you know your kids well enough, give the soccer fan a famous player or team, give the student who loves art an artist. Help them expand their interests!
  4. Good intro to lots of different types of culture or you could focus on art or musicians or writers or athletes or scientists or natural features or…you get the picture.

If you’d like your own copy of ready-to-use Spanish alphabet cards, you can get them here!


Conversation Circle: 1st Attempt

*This is a classic post from my previous blog, Musings de la Maestra McH. Enjoy!*

A week or so ago I had the good fortune to run across this post by Amy Lenord (@alenord) about conversation circles.  I’d been trying to come up with good ways to get my students talking in a natural way.  We’ve been studying food so I choose food/restaurants as our topic.  I introduced the main idea of what we’d be doing and gave students 5 minutes to write 3 questions in Spanish.  I made sure to emphasize that they should not be close ended questions.  We wanted to facilitate conversation.  I have 14 students so it was easy to do as a big group.  I handed out expectations in English and a list of helpful phrases to guide them.

At first I had a few shy ones that were a bit overwhelmed and/or lost.  I had one student ask, “What if we have no clue what anyone is saying?”.  I told her that if that was the case, she should listen and focus on picking out words she knew and that if she didn’t understand people’s answers she could take charge and ask one of her questions!  After about 15 minutes this student became comfortable and jumped in forming great answers.

As we went, I wrote helpful words on the board such as “healthy” and “fast food” that students could refer to.  I am fortunate to have an incredible group of students this year in Spanish 3 and everyone participated.  For those who struggled, I pointed them to the guiding phrases to start and expand upon their simple answers and they did!

We got in a pretty heated discussion after the question, “What is your opinion on onions”.  Who would have guessed?  I was afraid there might be a lot of silence and we might run out of topics or original answers but that was not the case!  I kept track of how many times the students spoke and gave them a grade for participating.  I’m not a big fan of participation grades but felt it fit here.  Student held each other to a pretty high standard and no one tried to pull one word answers or repeat exact answers someone else had said.  I was so impressed with the prior knowledge students used and how they built upon the starting phrases.

I’m hoping to do this on a weekly or biweekly basis.  We have a movie unit coming up next so I think that will be a great topic!

Thank you Amy Lenord for sharing what you’ve learned in your first few goes of this activity!  What do you do to get students talking?

Until Next Time,

Maestra McH

Website Built with WordPress.com.

Up ↑

Design a site like this with WordPress.com
Get started